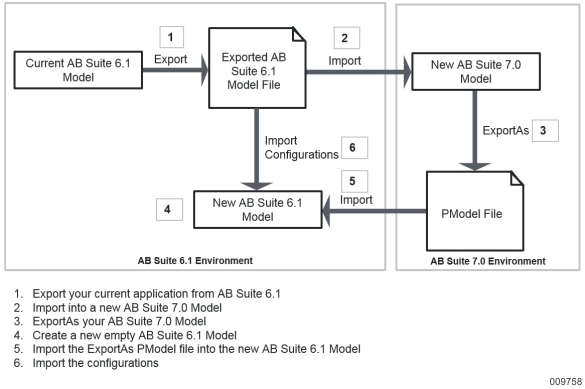
To use the ExportAs feature, you must create an AB Suite application environment for both AB Suite 7.0 and 6.1 models. This establishes a link between the AB Suite 7.0 and 6.1 models allowing changes to be ported from AB Suite 7.0 to 6.1 by using ExportAs, as shown in the following image:
Note: It is recommended to use the AB Suite 7.0 Model for only creating fixes to the AB Suite 6.1 application by using the ExportAs feature. Any new development has to be done on a separate AB Suite 7.0 Model database.
Perform the following steps to establish an initial application environment for your application to use the ExportAs feature:
Export the AB Suite 6.1 model file from AB Suite 6.1 project by selecting Export... from the File menu
Copy the exported model file to the AB Suite 7.0 environment.
Import the AB Suite 6.1 model into a new AB Suite 7.0 model by using the Model Importer. See for more information on importing an AB Suite model.
Note: The file must be imported using the Model Importer only.
Create a new project by attaching to the database you created in Step 3.
ExportAs from the AB Suite 7.0 project into a .pmodel file.
To ExportAs from the AB Suite 7.0 project into an AB Suite 6.1 compliant .pmodel file, perform the following:
Open the command prompt as Administrator.
Navigate to the directory in which you want to save the generated .pmodel file.
Type the following command and press Enter:
exportas -m <ModelName> [-f <ExportFile>] [-s <SqlServer>] [-l <LogFileName>] [<QualifiedElementName…>]
Where,
-f <ExportFile> — Specifies the location of the .pmodel file that you want to export.
Note: If you do not use this switch, an ExportFile name is created with the same name as the ModelName.
-s <SqlServer> — Specifies the SQL Server instance containing the model.
Note: If you do not use this switch, the default instance in the local machine is used.
-l <LogFileName> — Specifies the name and location of the ExportAs log file.
Note: If you do not use this switch, a default log file is created with the same name as the ExportFile name.
<QualifiedElementName…> — Specifies one or more elements to be ExportedAs. If you are specifying more than one element it must be separated by a space.
Note: If you do not use this switch, the entire model is exported by default.
For example,
ExportAs.exe -m SampleDB -s DevServer\MyABSDB -f C:\Sample.pmodel
-l "C:\My Temp\Sample.log" Sample.Cust Sample.LoadRept
Copy the .pmodel file to the AB Suite 6.1 environment.
Create a new AB Suite 6.1 project. Refer to Adding a Project with an AB Suite Application for more information on creating a new project.
Select Import... from the File menu and import the .pmodel file.
Note: When you are importing the .pmodel file from the Import Wizard, select Advanced Settings from the left pane, select Replace in the On Element Clash group, and then click OK.
You can now import the configurations from the original AB Suite 6.1 model.
Type the following command in the command prompt to import the configurations from the AB Suite 6.1 model file that you exported in Step 1:
Import -m <New 6.1 Model Name> -ocm <Old 6.1 Model Name>.model
You can now deploy the model by following the normal build procedure.