Installing Data Exchange Management Studio
You must first install DEMS, configure a virtual environment, and then associate and assign users and roles in that environment. You could either use the built-in environment, roles and users, or create your own. After configuring the environment, roles and users you can proceed with installing the other Data Exchange components in the desired environment.
If you require secure connections among the Data Exchange internal Windows components, then when you create or configure an environment in DEMS, you need to enable the “Secure Connection” option for that environment. If Secure Connection is enabled for an environment, then you need to install certificates on the required machines and then select the certificates to use in DEMS. By default, the “Secure Connection” option is disabled. For more details on enabling secure connections, refer to Data Exchange Management Studio (DEMS) Help.
Prerequisites
Before installing DEMS, you must
Install all the prerequisite software. Refer to Section Supported Operating Systems and Prerequisite Software.
Configure IIS version 6 or higher as shown in the following screens:
Note: The screens provided here depict the options in an IIS Server installed on a Windows Server 2019 Standard machine. The options might be different depending on the version of the IIS Server and the type of the Windows operating system.
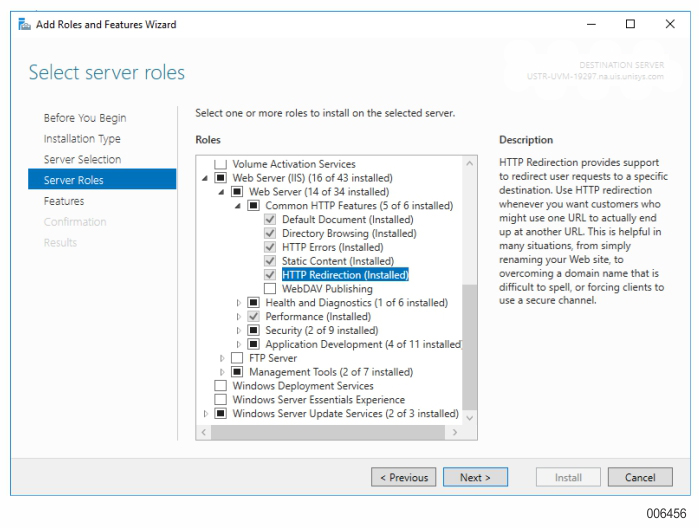
Install Windows Authentication as follows:
Open Server Manager.
Click Manage > Add Roles and Features > Server Roles.
Check Windows Authentication and click Next.

Windows Authentication is installed.
Make a SQL Server instance available so that the Data Exchange Management Studio database can be created on it.
Create the SQL Server credentials with administrative privileges in the SQL Server Management Studio if you want DEMS to connect to the SQL Server using SQL Server authentication.
If you want DEMS to connect to SQL Server using Windows Authentication, then the user installing DEMS must have the "sysadmin" role. Depending on whether you access a local or remote SQL Server instance, the suitable SQL Server login is required as mentioned in the following table. If the login does not already exist, the installer creates the login in the SQL Server Management Studio. Ensure that the user installing Data Exchange has the “sysadmin” role.
Table 6. Connecting to a SQL Server Instance using Windows Authentication
Local User Domain User Local SQL Server Instance Requires a SQL Server login of “.\<user>” with sufficient privileges.
Requires a SQL Server login of “<domain>\<user> with sufficient privileges.
Remote SQL Server Instance* Requires a SQL Server login of “<domain>\<machine>$” with sufficient privileges.
Requires a SQL Server login of “<domain>\<user>” with sufficient privileges.
* It is recommended to use SQL Server authentication if your SQL Server instance is on a different domain. Install the SSL certificate if you want to use the HTTPS protocol to access DEMS. For more information about obtaining and installing the SSL certificate, refer to Appendix C, Enabling HTTPS for Administration Site and DEMS .
To install the Data Exchange Management Studio on your system
Save and unzip the Data Exchange installer package on your machine.
Right-click on Start, and then select Command Prompt (Admin).
The Administration: Command Prompt window appears.
In the Administration: Command Prompt window, navigate to the folder where you have unzipped the Data Exchange installer package.
For example, if you have unzipped the Data Exchange installer package in C:\User\DataExchange5.0 folder, then navigate to the DataExchange5.0 folder by running the following command:
cd C:\Users\DataExchange5.0\
Enter the following command to run the DEMS installer:
cd C:\Users\DataExchange5.0\“Unisys Data Exchange Management Studio x64.msi”
The Unisys Data Exchange Management Studio Setup Wizard appears.
Click Next.
In the SQL Server Instance Configurations page
Select the SQL Server instance you want to connect to.
The DEMS connects to this instance and creates an internal database called UnisysDExchMgmtDB.
Notes:
Data Exchange supports SQL Server Standard and Express versions. If you have installed the SQL Server Standard version, the instance name on this page displays "(local)". But if you have installed the SQL Server Express version, you must change the instance name from "(local)" to "(local)\sqlexpress".
If you are connecting to a remote SQL Server instance, enter the full name or the IP address of the remote machine and enable the SQL Browser service on the remote machine.
Select one of the following authentication methods for the Data Exchange Management Studio to connect to the SQL database:
Windows Authentication: To connect to the SQL database using your Windows credentials.
Note: In this case a login called IIS APPPOOL\DataExchangeMgmtStudioAppPool is created in Microsoft SQL Server Management Studio > Security > Logins, after the installation is completed. And when you access the DEMS Site, it uses this App Pool to access the DEMS.
SQL Authentication: To connect to the SQL database using the credentials that you received from your SQL Server administrator. In this case, you must provide your credentials in the relevant fields.
Notes:
To choose "SQL Authentication", you must have the SQL credentials specific for Data Exchange created in the SQL Server. The user name must have the “sysadmin” role in the SQL Server.
When you access DEMS using the SQL Server authentication, it uses the user name and password you provided for the SQL Authentication to login.
 Warning
While creating the credentials using the SQL Server Management Studio, clear the Enforce password expiration check box in the Login-New window, because once the password expires in the SQL Server, DEMS cannot connect to the SQL Server. You do not have any option of using the new password in the DEMS unless you reinstall it.
Select Secure Database if you want to enable secure connection to the Data Exchange Management Studio database.
Notes:
You must have installed and configured SSL certificate to use secure connection. For more details refer to Appendix C, Enabling HTTPS for Administration Site and DEMS .
You must provide full host name in the SQL Server instance box above.
Click Test Connection to ensure that a connection is established between the DEMS and your SQL Server instance.
A green tick mark appears indicating success.
Note: You cannot proceed unless a connection is established.
Click Next.
The Application User Credentials page appears. Select one of the following options:
Create a New Application User Account
If you create an application user account, then DEMS runs under this account, thereby enhancing security. However, if you create it on the local machine, DEMS cannot connect to a remote SQL Server instance.
If you select this option, then on the Create an Application User Account page, enter the domain name or the host name without the DNS suffix, and then provide the user details.
Note: You must create a new user account. If you have created a user account with the same name as a previously existing account, then the installation fails as the old account might still be in use by a system resource. If you need to use the same user name, you must restart the machine and reinstall DEMS.
Select an Application User from Existing Accounts
If you select this option, then on the Select an Application User from the Existing Accounts page, enter the domain name or the host name without the DNS suffix, and then select the user in that domain or host.
Notes:
If you selected “Windows Authentication” in the previous step, then the application user account you select here must have the “db_reader“ or “db_datawriter" or higher privilege in the SQL Server Management Studio. The application user account must also have the “log on as a service” privilege if you are accessing a remote SQL Server instance.
Post installation, if the browser prompts you to enter the login credentials to access DEMS, enter the current login user or any other authorized account credentials which will allow you to log in to your machine. You cannot use the application user account that you have created or selected as it does not have the required privileges.
Use System Account as Application User Account
If you select System Account, ensure that the “dbcreator” role is assigned to the system account "NT AUTHORITY\SYSTEM".
If you are connecting to a local SQL Server instance using Windows Authentication, a SQL Server login of “IIS APPPOOL\DataExchangeMgmtStudioAppPool” with sufficient privileges is required. If you are connecting to a remote SQL Server instance using Windows Authentication, a SQL Server login of “<domain>\<machine>$” with sufficient privileges is required.
If the login does not already exist, the installer creates the login in the SQL Server Management Studio.
Click Next.
The Destination Folder window appears, displaying the default location where the DEMS will be installed. Click Browse to change the default installation location.
Click Install.
The Installing Unisys Data Exchange Management Studio page appears, displaying the progress of the installation.
Click Finish to finish the installation.
Use the following link to access the DEMS Site from the local machine: http://localhost/DataExchangeManagementStudio/.
Note: To view all the elements of the DEMS clearly, the screen resolution must be 1280 X 800 and above.
If you want to control user access to DEMS, you must configure Windows Authentication. For more information about Windows Authentication , refer to Appendix A, Controlling Access to DEMS and Administration Site.
The Welcome screen of DEMS displays three tiles- Environment, Role, and User/Group. Click Create New to create a new environment and role. Click Use Existing to use the built-in environment and role.
To associate the user to an existing environment, click Associate in the User/Group tile.
The Manage User/Group page is displayed.
Select the local user or the built-in user, and then click Edit.
Select the environment (built-in or user-defined) with which you want to associate the local user or the built-in user and assign the roles and privileges. For more information about assigning roles and associating users to environments, refer to Data Exchange Management Studio (DEMS) Help.
You can now proceed to install the Windows components of Data Exchange in the environment with which you associated the user.
Note: You can install only the components for which you have been granted the installation privileges in DEMS.
You cannot install multiple versions of DEMS on the same machine. A single instance of DEMS can work with multiple versions of Data Exchange components and is backward compatible. For example, DEMS 5.0.19 can work with DDW 5.0.19, 5.0.18, ... but not with 5.0.20.